
First attempt at true handleless design
+5
Stumpy
Michael W
Lukeh1101
Darrel
Jaynehiddleston
9 posters

Page 1 of 2 • 1, 2 
 Jaynehiddleston
- Posts : 366
Join date : 2017-11-03
Age : 37
Location : Dumfries, Scotland 
 First attempt at true handleless design
Fri Jul 20, 2018 3:44 pm
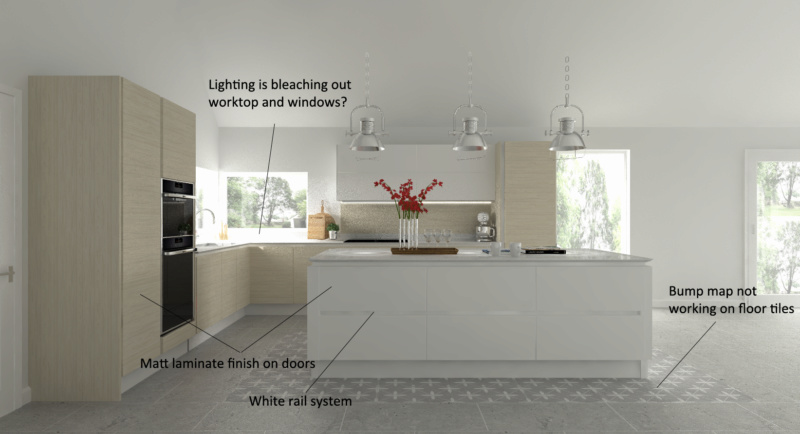
Hi guys, as title suggests - this is my first bash at a true handleless.....
please see attached image which areas I note need improved. Any texture advice/help much appreciated!
This was rendered on "high" just to give you an idea of how it is currently looking. On V20 Articad (maybe V21 would improve textures?)
Thanks
please see attached image which areas I note need improved. Any texture advice/help much appreciated!
This was rendered on "high" just to give you an idea of how it is currently looking. On V20 Articad (maybe V21 would improve textures?)
Thanks
 DarrelAdmin
- Posts : 968
Join date : 2017-10-24
Age : 55
Location : Nottingham
Re: First attempt at true handleless design
Fri Jul 20, 2018 3:57 pm
Jaynehiddleston wrote:Hi guys, as title suggests - this is my first bash at a true handleless.....
please see attached image which areas I note need improved. Any texture advice/help much appreciated!
This was rendered on "high" just to give you an idea of how it is currently looking. On V20 Articad (maybe V21 would improve textures?)
Thanks
Hi Jayne....
I bet you have enjoyed the change from In-Frame...
Could you PM the file so I can have a look...I have a couple of tricks... which I have played with before but not really mentioned much.
I take it the only lighting is from the lit view and sky/sun light?
- DarrelAdmin
- Posts : 968
Join date : 2017-10-24
Age : 55
Location : Nottingham
Re: First attempt at true handleless design
Mon Jul 23, 2018 11:52 am
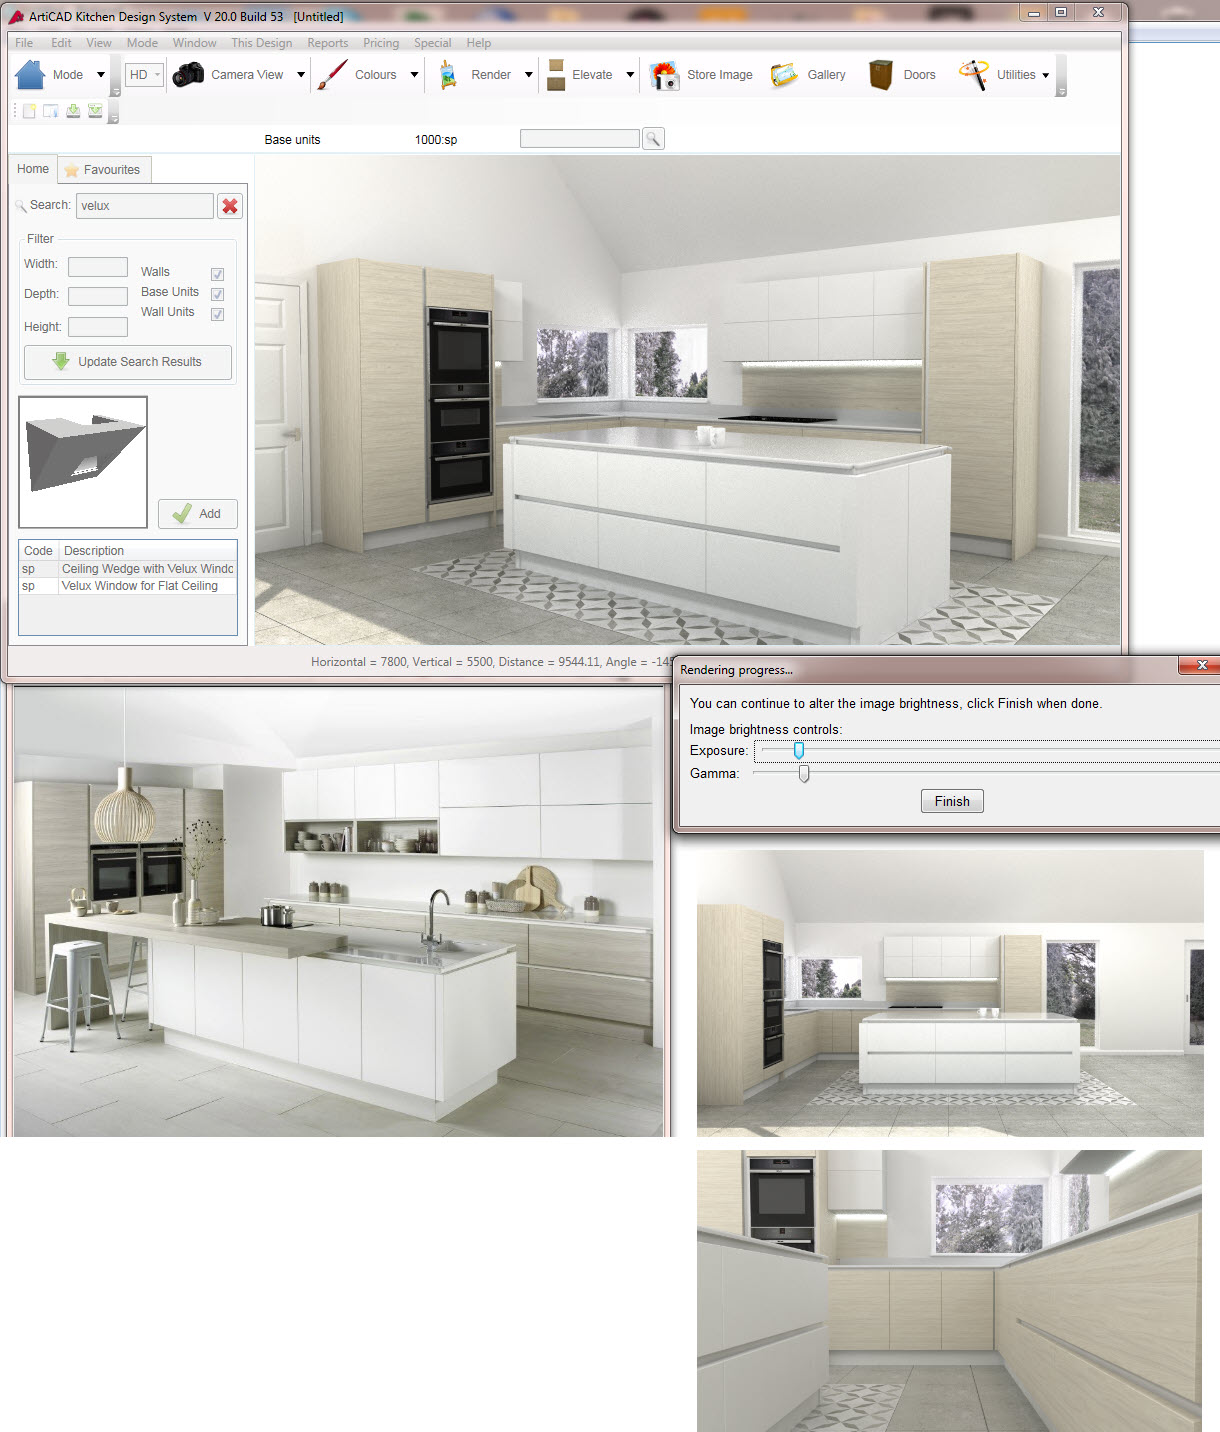
Drawing Graphic edits:
1. floor tiles. The reason the bump is not really showing is that the the floor tile board is in exactly the same place as the main floor. ArtiCAD does not cutout where where we place these graphics so the floor tile board and main floor are sharing the same z space. The way I got over this problem it just add loads of floor tile boards with a thickness of 10mm.
2. Changed all windows and doors with the "External" option ticked.
3. LED Strip Lights. I used two boxes one to create the lens body and the other smaller and inside th the lens body to the lit appearance. I will go into the reasons why in the materials an light section below.
4. Added a few "Ceiling Wedges with Velux Windows" for hidden fill lighting. See Lighting Section Below.
5. Added a large cubic box 25000x25000x10 to help control the sun brightness and colour 5600 off the ground. See material Section Below.
Materials:
Some of the textures obviously did not come/where included with the kit file but I found similar or just used RGB colours instead.
1. White materials - changed "walls" and "ceiling wedges" to 245,244,243 RGB and used the Sheen calculator values for 2% sheen for an emulsion paint finish.
2. Changed the Gloss work of the External Door and Window frame white materials to 245, 244, 243 and gave them the Sheen value of 80% sheen.
3. All Fascia materials (bleached walnut, matt white) with a Sheen value of 30% with a base IOR value of 2.55.
4. Changed the Ceiling Wedges material to "Allow light through". - See lighting section below for more details.
5. Changed the Window Glass material to only have 87% transparency (0.87) as this is more physically correct for a winow pane and also helps with tone mapping (avoiding it to darken the overall image to much).
6. The large cubic box I set the transparency to 0.225 and unticked the "Allow Light Through" this then reduces the sun brightness inside the room. I gave it a bit of colour also 254, 245, 243 RGB...
Lighting:
1. Changed all Windows and doors to use the global materials, "Revert to original" option and changed the view options. I did then change individually on of the window views (RH of sink) indiviually to use the shifted 50% garden texture as it looked odd mirroring the other one on the hob run.
2. The LED strip lights as I mentioned above I used two cubic boxes the outer larger one to have 0.8 transparency and with a transparency glossiness value of 0.2 to create a frosting effect of what some lenses have in reality. lowering the transparency help with tone mapping (avoiding it to darken the overall image to much).
3. Used the "Ceiling Wedges with Velux Windows" as fill lights inside the "Ceiling Wedges" to help fill out the lack of interior lighting as I have zero'd the point light sources. These help to reduce burnout around the windows and with a size of about 1000x1000mm create softer shadows.
All the accessories apart from the mugs are missing so the render looks a bit bare but the overall effect is close to the brochure image I think...
 Lukeh1101
- Posts : 109
Join date : 2017-11-11
Age : 34
Location : Grimsby
Re: First attempt at true handleless design
Mon Jul 23, 2018 12:44 pm
Awesome work Daz! Such a difference!!
- DarrelAdmin
- Posts : 968
Join date : 2017-10-24
Age : 55
Location : Nottingham
Re: First attempt at true handleless design
Mon Jul 23, 2018 1:11 pm
Lukeh1101 wrote:Awesome work Daz! Such a difference!!
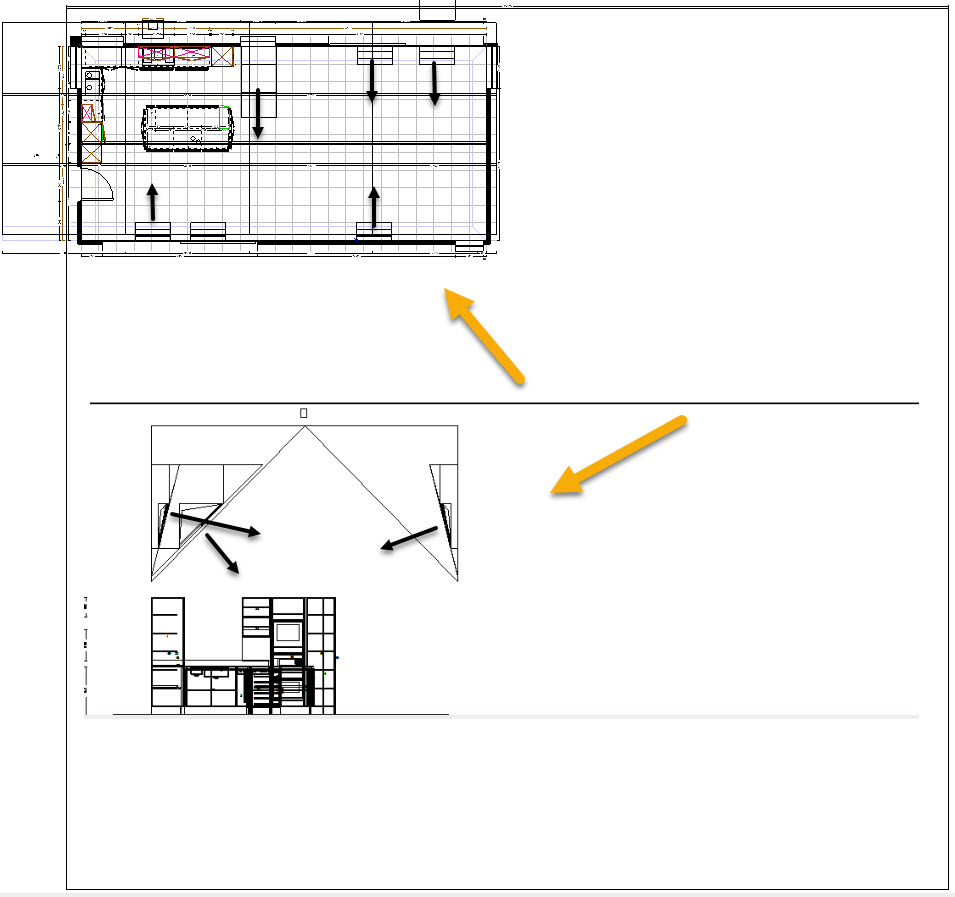
Thanks Luke..... It would be nice to have a spherical sky to help out with lighting above the window line.. this helps out in that regard...
Jayne's Otto Kitchen Plan and Elevation showing lighting and Ceiling Wedges hiding the additional Velux window wedges:
- Jaynehiddleston
- Posts : 366
Join date : 2017-11-03
Age : 37
Location : Dumfries, Scotland
Re: First attempt at true handleless design
Mon Jul 23, 2018 2:02 pm
this is a world of difference. Daz.....and there is no way I could ever achieve this look with these settings without you on board. You honestly should consider doing this for a profession. The people need training and you can offer it at such a high level! I would sign up immediately. I hope you can understand how appreciated your help is on this forum.
Can you please email me the file back over to see exactly what you have done?
Can you please email me the file back over to see exactly what you have done?
 Michael W
- Posts : 199
Join date : 2017-11-06
Age : 47
Location : Preston, Lancashire
Re: First attempt at true handleless design
Mon Jul 23, 2018 2:24 pm
I agree with Jayne, I really think you should give it a go - I think there are enough people out there who would happily pay to get the benefit of your knowledge and experience. I know I've learned more already from you than I could ever have learned from the official ArtiCAD training!
I must admit, I've been that busy recently I've not had the time to look at the sheen calculator, but it looks like it can make a huge difference when rendering. I'll try to get around to it once I've finally mastered V21...
I must admit, I've been that busy recently I've not had the time to look at the sheen calculator, but it looks like it can make a huge difference when rendering. I'll try to get around to it once I've finally mastered V21...
- Lukeh1101
- Posts : 109
Join date : 2017-11-11
Age : 34
Location : Grimsby
Re: First attempt at true handleless design
Mon Jul 23, 2018 2:33 pm
Completely agree Daz.. I'd happily pay for a day course to improve my renders. I often have the same problems as Jaynes first image and although eventually I'd get to the point where im somewhat happy it does often feel like trial and error. To do what you have there to get the difference in results so quickly is brilliant.
 Stumpy
- Posts : 137
Join date : 2017-11-06
Age : 55
Location : Gravesend
Re: First attempt at true handleless design
Mon Jul 23, 2018 2:52 pm
Sign me up! 
 Mingerz
- Posts : 218
Join date : 2017-11-06
Re: First attempt at true handleless design
Mon Jul 23, 2018 2:54 pm
Completely agree, great work! I'm always struggling to get enough light into the room without post editing. I use the sheen calc all the time.
- DarrelAdmin
- Posts : 968
Join date : 2017-10-24
Age : 55
Location : Nottingham
Re: First attempt at true handleless design
Mon Jul 23, 2018 3:36 pm
Thanks all for your kind and positive comments
I will email you the drawing Jayne soon...
I will email you the drawing Jayne soon...
- Jaynehiddleston
- Posts : 366
Join date : 2017-11-03
Age : 37
Location : Dumfries, Scotland
Re: First attempt at true handleless design
Tue Jul 24, 2018 8:52 am
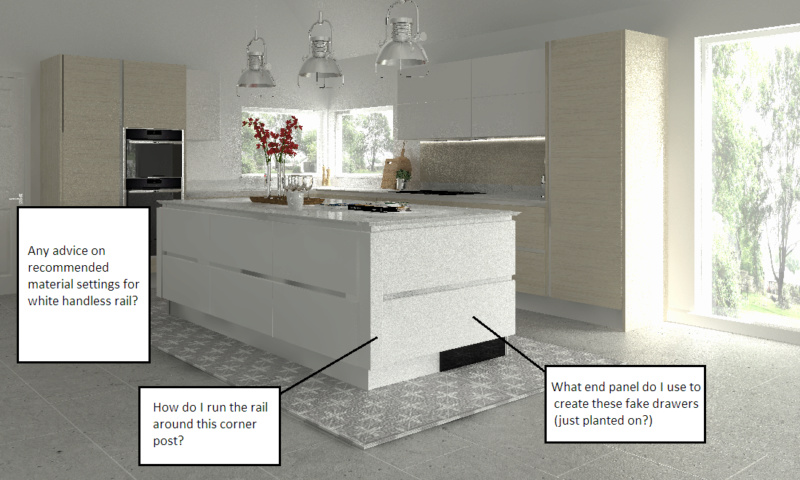
Thanks Daz, will take a look now. A couple more questions I have based on this, if any other users are also able to help.... please see image below.
Has anyone designed the corner post and end of island like this before? I think it looks nice running through, even if the "drawers" are just fake?
- Michael W
- Posts : 199
Join date : 2017-11-06
Age : 47
Location : Preston, Lancashire
Re: First attempt at true handleless design
Tue Jul 24, 2018 10:10 am
I've done this a few times before, there might be an easier way, but I've not found it!
For the false drawers, use a real 2 drawer pack, set at the island width minus 180mm and 70mm deep. position in the centre of the units.
For the corner posts, search for cnrpst and choose the External Handleless Corner Post. Change the depth and width to 70mm (both sets) and the height to 510mm and turn off worktop. Add another one of these, change the widths and depths to the same, but change the height to 360mm, no plinth and 510mm from the floor. Add to one side of the island.
Copy and paste these two corner posts and add them on to the other end.
Copy and paste all 5 items for the other end.
Here's one I quickly mocked up (Ignore the plinth, V21 still has issues with the plinth on returns)
- Michael W
- Posts : 199
Join date : 2017-11-06
Age : 47
Location : Preston, Lancashire
Re: First attempt at true handleless design
Tue Jul 24, 2018 10:17 am
Oh and as for the white handleless rail, I have it set at RGB 248,247,246 and plastic finish.
- Jaynehiddleston
- Posts : 366
Join date : 2017-11-03
Age : 37
Location : Dumfries, Scotland
Re: First attempt at true handleless design
Tue Jul 24, 2018 10:19 am
Thanks Michael! Those material settings are great - straight "out the box" ??
Would you mind sending me this Articad file through to my email - jayne@hiddlestonjoiners.co.uk so I can check the components against mine? Cant seem to find a generic External Handleless Corner Post? And the Burbidge one looks bugged?
Would you mind sending me this Articad file through to my email - jayne@hiddlestonjoiners.co.uk so I can check the components against mine? Cant seem to find a generic External Handleless Corner Post? And the Burbidge one looks bugged?
- Michael W
- Posts : 199
Join date : 2017-11-06
Age : 47
Location : Preston, Lancashire
Re: First attempt at true handleless design
Tue Jul 24, 2018 10:26 am
Jaynehiddleston wrote:Thanks Michael! Those material settings are great - straight "out the box" ??
Would you mind sending me this Articad file through to my email - jayne@hiddlestonjoiners.co.uk so I can check the components against mine? Cant seem to find a generic External Handleless Corner Post? And the Burbidge one looks bugged?
No problem in emailing it to you, but it won't open unless you have v21 installed?
All the materials are out of the box, apart from the handleless rail colour, which I tweaked slightly.
- Jaynehiddleston
- Posts : 366
Join date : 2017-11-03
Age : 37
Location : Dumfries, Scotland
Re: First attempt at true handleless design
Tue Jul 24, 2018 10:36 am
Thanks again,
Yeah i'm still on V20 thanks anyways. Think i've almost got it, worktop isnt quite lining up and need to sort wine cooler peaking through plinth on other side but thanks for that. Would have been messing around for hours if you hadnt helped!
Yeah i'm still on V20 thanks anyways. Think i've almost got it, worktop isnt quite lining up and need to sort wine cooler peaking through plinth on other side but thanks for that. Would have been messing around for hours if you hadnt helped!
- Michael W
- Posts : 199
Join date : 2017-11-06
Age : 47
Location : Preston, Lancashire
Re: First attempt at true handleless design
Tue Jul 24, 2018 10:39 am
I've just re-done it in v20 for you, I'll email it over in a few mins
- DarrelAdmin
- Posts : 968
Join date : 2017-10-24
Age : 55
Location : Nottingham
Re: First attempt at true handleless design
Tue Jul 24, 2018 10:48 am
Sorry Jayne...
I misunderstood the question of creating the fake drawer end panels via email.... I thought you where asking how and if they are available.... Will Burbidge make them or are you making/modifying them yourselves then?
I misunderstood the question of creating the fake drawer end panels via email.... I thought you where asking how and if they are available.... Will Burbidge make them or are you making/modifying them yourselves then?
- Jaynehiddleston
- Posts : 366
Join date : 2017-11-03
Age : 37
Location : Dumfries, Scotland
Re: First attempt at true handleless design
Tue Jul 24, 2018 11:28 am
Thanks Michael, really helpful
Yes Daz, I dont really understand how it will work yet - Michael can you tell me what components you would order to create this? I figured I will design it first and work it out later..... Plenty of kitchens on google with this design though so must be possible. This is all new to me.....!
Yes Daz, I dont really understand how it will work yet - Michael can you tell me what components you would order to create this? I figured I will design it first and work it out later.....
- DarrelAdmin
- Posts : 968
Join date : 2017-10-24
Age : 55
Location : Nottingham
Re: First attempt at true handleless design
Tue Jul 24, 2018 11:39 am
Jaynehiddleston wrote:Thanks Michael, really helpful
Yes Daz, I dont really understand how it will work yet - Michael can you tell me what components you would order to create this? I figured I will design it first and work it out later.....
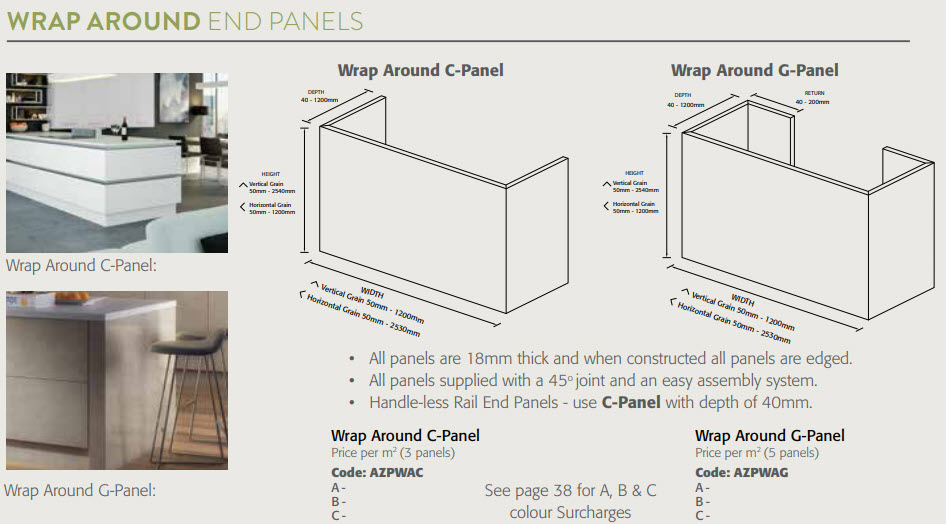
This is how BA spec them:
- Jaynehiddleston
- Posts : 366
Join date : 2017-11-03
Age : 37
Location : Dumfries, Scotland
Re: First attempt at true handleless design
Tue Jul 24, 2018 11:44 am
Ah thats helpful thanks Daz, Burbidge have similar, so its one solid panel with rail added to the top and middle as opposed to 2 separate drawer fronts....
- Michael W
- Posts : 199
Join date : 2017-11-06
Age : 47
Location : Preston, Lancashire
Re: First attempt at true handleless design
Tue Jul 24, 2018 12:00 pm
Jaynehiddleston wrote:Thanks Michael, really helpful
Yes Daz, I dont really understand how it will work yet - Michael can you tell me what components you would order to create this? I figured I will design it first and work it out later.....
It's a little messy with Burbidge, as they don't have an external corner post available, so you have to be a little creative (and have a good fitter).
For each corner post, you need a 325x296 door, which can be then cut down to create the L-shaped post, so at least you can make it any depth you want, I'd recommend 50x50mm to make it easier with the handleless rail.
For the dummy drawers, you'll need whatever width drawer front that suits the island. It's cheaper to make the island narrower or deeper to suit the drawer front sizes than it is to make the drawers fronts to suit.
To cover both sides you'll need:
8 x 325 x 296mm doors
4 x 325 x *96mm drawer fronts (change * to island width)
The corner posts and drawer fronts can be screwed onto batons, which can then be screwed to the carcase sides; after the rail has been screwed to the carcase sides.
Obviously, you need enough of the top and mid rails and 4 x ALL90EX, 4 x ALC90EX.
- Michael W
- Posts : 199
Join date : 2017-11-06
Age : 47
Location : Preston, Lancashire
Re: First attempt at true handleless design
Tue Jul 24, 2018 12:04 pm
Jaynehiddleston wrote:Ah thats helpful thanks Daz, Burbidge have similar, so its one solid panel with rail added to the top and middle as opposed to 2 separate drawer fronts....
If you don't want drawer front on the end, then this is the easiest option.
If you do want the drawer front though, you have to use the process above, unless you have a way of finishing the cut ends and the island is exactly the right depth - 604mm, 908mm or 1168mm. Then you could just use the Mitred Island End panels and cut them yourselves.
 Joe
Joe- Posts : 325
Join date : 2017-10-24
Age : 56
Location : Glasgow
Re: First attempt at true handleless design
Tue Jul 24, 2018 2:50 pm
Nice work Michael,
Have always had issues with positioning external posts in articad plus having to do this style with 4 parts is just another thing articad could easily fix. Also the gaps always look crap! This is mainly due to how articad do the profiles of the frontals. (see below) I ended up creating my own so that it follows the profile giving a much neater gap and of course less work.
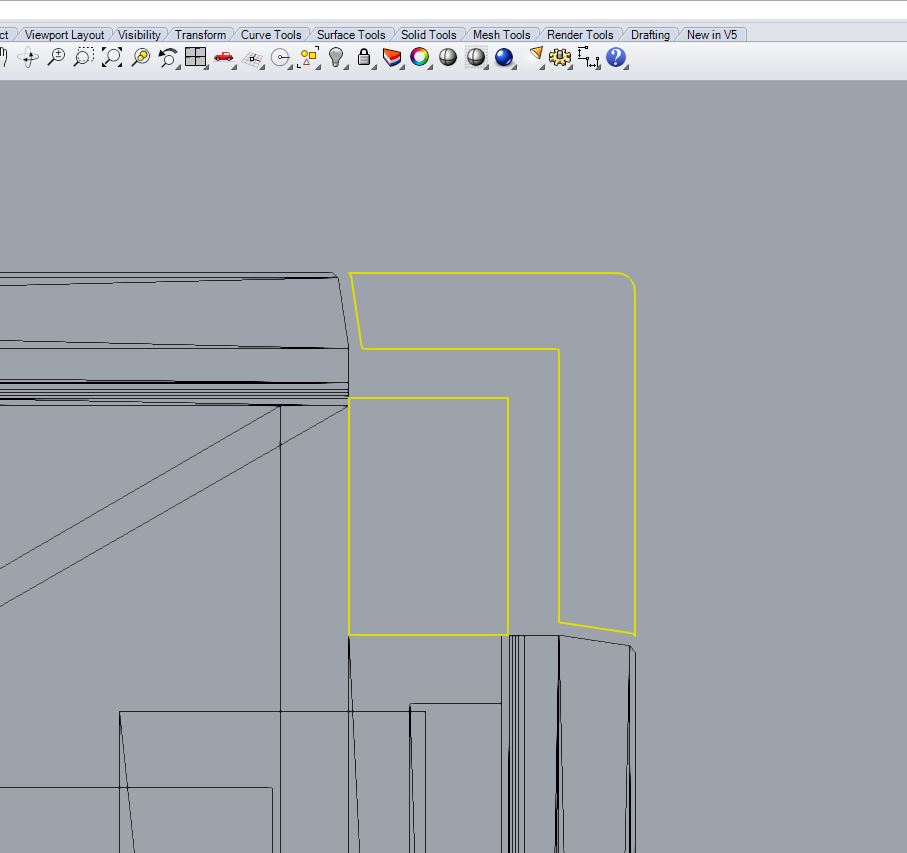

Have always had issues with positioning external posts in articad plus having to do this style with 4 parts is just another thing articad could easily fix. Also the gaps always look crap! This is mainly due to how articad do the profiles of the frontals. (see below) I ended up creating my own so that it follows the profile giving a much neater gap and of course less work.
Page 1 of 2 • 1, 2
Permissions in this forum:
You cannot reply to topics in this forum|
|
|